
Adventures in Light Painting Portraits
A couple of days ago I did a fun light painting portrait shoot with a local model named Zylina. There were some high points and some low points with the actual light painting bits, but she was a trooper putting up with both me and the cold (HA). When I had first contacted her, I mentioned a couple of different ideas for some shoots and honestly the one I thought the least about was the light painting one. As fate would have it, that’s the option she chose. Eh, it happens. The original photo I had the idea for was this cool shot that I’d still love to do one of these days with underwater lights and such, but in lieu of a light source strong enough that also happened to be waterproof, I had to improvise. She told me the reason she went with the light painting was actually because it sounded interesting and something she’s never done before. The problem here is that it was also the first time I’ve ever done it myself.

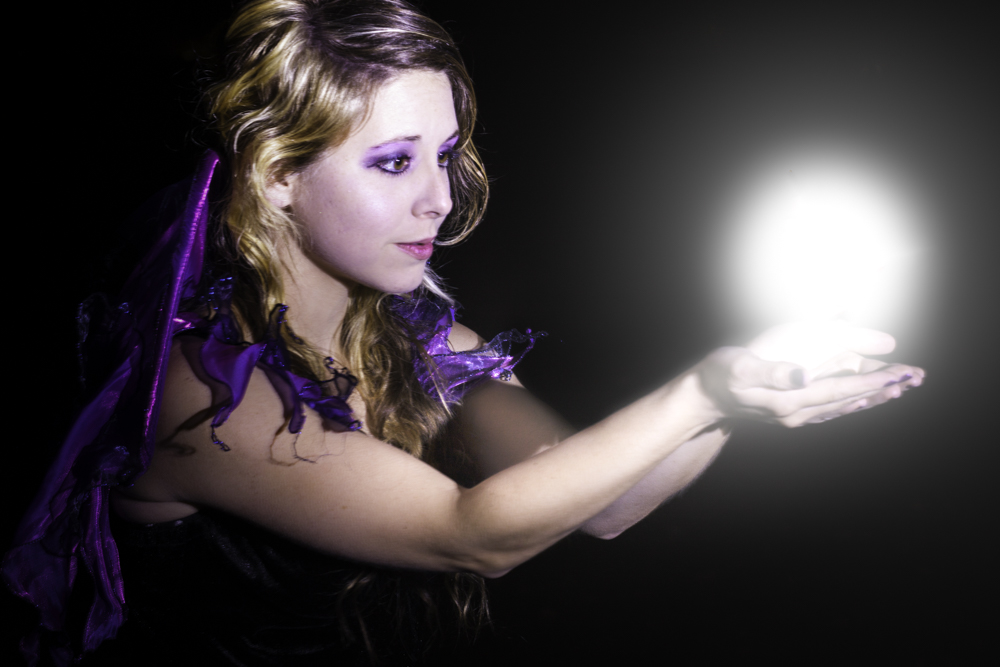
I have done some light painting photos in the past, but never portraiture, only landscapes. It’s not like I had no clue what was going to happen, that would’ve been incredibly unprofessional, but due to the improv with the underwater light source, I had to come up with a more solid guaranteed image. With some time and more tea than I care to mention, I came up with a whole slew of concepts. This photo here above was probably the most fleshed out idea of the bunch. Originally I wanted to have her holding a little fairy which I “light stamped” into the photo. It didn’t turn out as well as I had hoped it would, so I dropped the fairy bit and turned it to an orb of light. Light stamping by the way, was me taking my iPad with the image of the fairy and holding it still throughout the exposure. You can manipulate scenes by stamping in, for example, multiple of these little fairies by using the cover of your tablet or covering you phone screen and the uncovering it again once you move into place. I’ll do a video on this in the future, in case you’re curious.
While that photo ended up working out in the end, unfortunately there was another problem with a light source. If I’m honest, it was more wishful thinking than anything else that some cheap glow sticks could put out enough light to produce anything worthwhile. I actually opened the package up and they were already partially lit. So i figured they were duds, which they pretty much were. I wanted to create this glowing pathway leading to the model, almost like a glowing red carpet if you will. With how petty the light they gave off was, the exposure time had to be pretty long to compensate. This was leading into all kinds of problems.
As you can see from this slightly blurry photo here, this was indicative of the best I could have gotten from that glowing red carpet style idea in terms of focus. Yes you read that correctly, best not worst. See it was a really cold, late fall night and she wasn’t wearing the most warm clothing either. Combine the shivering cold with the long exposure times needed to paint with light and the (sometimes) awkward poses I made her hold and you have a recipe for not so sharp photos. Of course I could have used a flash to get her sharp and then paint in from there, but that wasn’t the look I was going for (nor my style). I still love that shot despite not being entirely in focus. Hey, focus is overrated anyway…right? :P

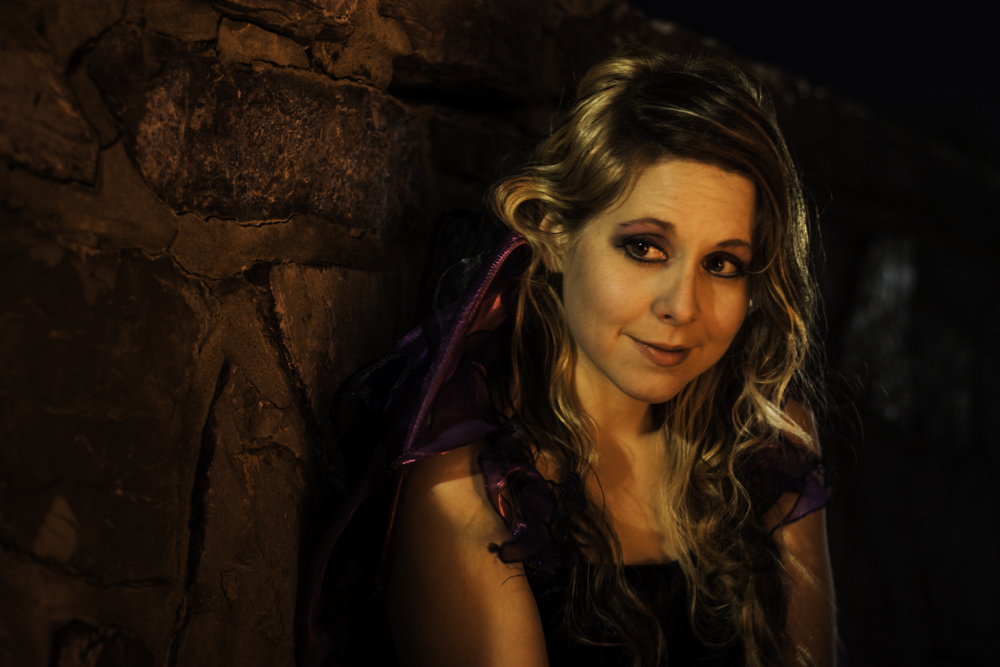
From here I transitioned into some more “portraity" kind of portraits. You know the type, it’s less about the concept and more about the model. Don’t get me wrong here, I really love these photos like the one above, but they were definitely the most impromptu of the lot. I used a mix of ambient light coming from a street lamp a couple feet away and an iPad with a solid color on the screen to act in a way that’s similar to a gel on a strobe. The great thing about painting though is that the source of the light doesn’t need to come from a static position inside of a single image. What I mean is that if I popped a strobe with a gel on it, the direction of light would be coming from one place. To get the light to come from multiple directions I would either need multiple flashes where I balance all the light and color between them, or I’d need to composite multiple shots together with different light sources to achieve the same effect. I find the tablet or phone idea to be more fun and really light is light, it’s all in how you use it that makes the difference. =)

All in all, I had fun and Zylina told me she enjoyed it, minus the cold of course, and she liked the images, so really that’s all that matters. We have plans to do another light painting shoot in the future when it’s perhaps not quite as cold or, more likely, inside somewhere. This whole experience got me wanting to do more light painted portraits and experiment more with lighting in general. If you’re reading this and you just found out about the technique or were on the fence about trying it, then I’d implore you to try it. Hell, what do you have to lose except time? We all know that’s not very valuable. *ahem* Seriously though these were really fun to shoot and you should try them. On top of that, whenever you do try out some light painting portraits, then drop a link here in the comments and I’ll check them out, as I’m sure others will do the same. If you’ve got any tips or tricks you’ve used or you just want to talk about your experience with them personally, then feel free to leave those in the comments too. It’s always cool to see how other artists approach the same technique differently.
Youtube
Learn. Create. Experience. Share.